Setting System Package Preferences
For each system package, you have some control over settings for data and editing. This is done through the menu on the System Package Dashboard to the far right. And choose the Settings menu.

Setting Preferences
By default your system package preferences have “Allow Severity Override”, “Enable POAM Tracking”, and “Auto-add Not Reviewed policy CCI statements” set as true. The other items must be turned on to be used immediately, and the POAM defaults for Office / Organization and Scheduled Completion Date are off until you set them. The description of each setting is below.

Uncredentialed Patch Scans Settings
If you wish to use uncredentialed scans to track information, you must allow that in your system package preferences as well. Select to allow it and the data that you wish to use. You can choose to use patch vulnerabilities and ports/protocols/services as well as software based on your desire.
When your system package or team subpackage users upload patch scan results, the screen will show them if they can or cannot use uncredentialed scans.
If a patch vulnerability, port, or software item is from an uncredentialed scan it will show an icon next to the listing showing it is from an uncredentiald scan. And the details of that item in the data table listing also will show credentialed or uncredentialed.
Use this setting if there are some machines or devices that cannot have a credentialed scan as there is no way to log into them remotely. However, you can scan them for some information that is pertinent to your system package.

Checklist Vulnerabilities Settings
To not allow Severity Override and Justification on editing checklists or in the bulk edit checklist area, disable this setting and save that prefererence. From then on, those two fields will be read-only for any system package or team subpackage editing checklist vulnerabilities through the web or via API.
If there is already data in checklists under the Severity Override and/or Justification this will not remove it. You can run a report to list any vulnerabilities like that to edit them before disabling that setting.
If you do not allow severity override on checklist vulnerabilities, set this on our system package.

Team Subpackage Settings
This setting allows you to specify that a checklist or hardware device can be in at most 1 Team Subpackage only. If this is not set, there is not a limit to how many Team Subpackages a checklist or device can be in at the same time.
If you already have Team Subpackages set and used with checklists and devices, you can run reports to see check if there are any that are in more than 1 Team Subpackage. You will have to move or remove them manually as this setting is not retroactive.
You may want to use this setting if you want to limit duplication of effort on checklists or devices for scans and other responsibilities.
IP Masking
IP masking involves tracking checklists, patch vulnerability, hardware, software, and PPSM data when a hostname is read in by IP Address versus hostname. By default prior to OpenRMF® Professional v2.13, any IP address used as a hostname had the first two of the four octets marked as xxx.xxx. This was done for security reasons while displaying data on the screen.
Now this setting allows you to keep that (default), only mask the first one, or disable IP masking altogether. This only updates newer scan data uploaded. It does not change past data with IP masking enabled by default.
Classification Settings
The Classification Settings allow you to set a top and bottom header on XLSX files and other downloadable files (not counting Checklists) with text and color. The default is no classification header and footer. Use the dropdown to go from None to Custom and set the text and color.
POAM Settings
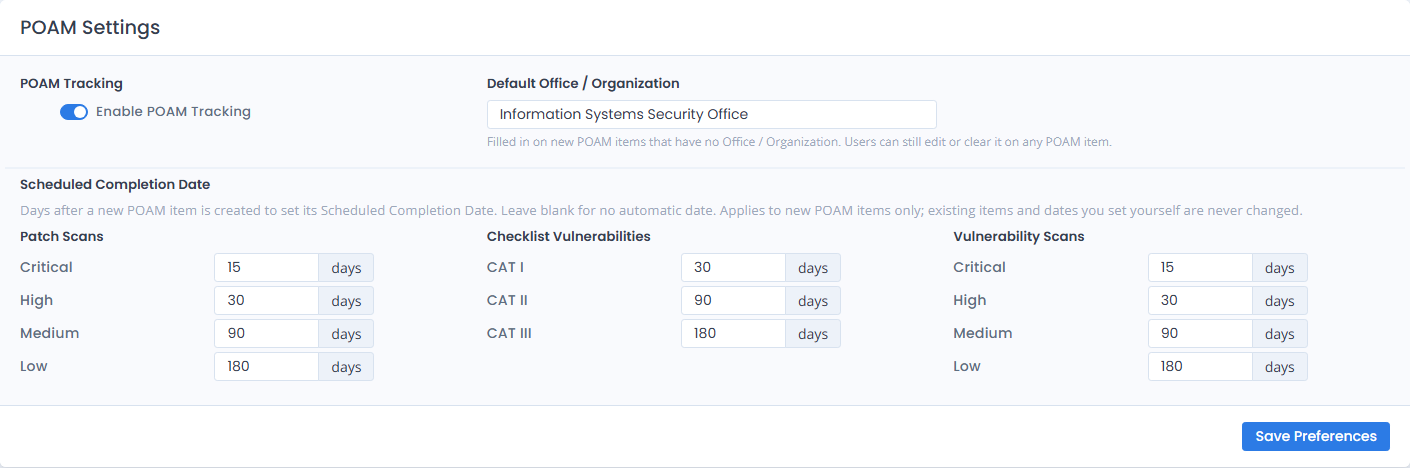
The POAM Settings section has its own card on the page. It is saved with the same Save Preferences button as the rest of the general preferences.
POAM Tracking
The “Enable POAM Tracking” setting temporarily can disable POAM tracking when you wish to do a bunch of changes, uploads, etc. and do not want the POAM to add/remove massive amounts of data in a very short time period.
YOU MUST remember to put this back to continue tracking all new and current items on your POAM automatically.
Default Office / Organization
Enter a Default Office / Organization to have it filled in automatically on every new POAM item that does not already have one. This includes items created from checklists, patch scans, technology vulnerability scans, compliance statements, and inherited controls, as well as items in your team subpackages. When you add a POAM item manually, the Office / Organization field starts with this default, and you can change or clear it before saving.
You can still edit or clear the Office / Organization on any single POAM item, or on many items at once with Bulk Edit POAM Items. Leave the default blank if you do not want one.
Scheduled Completion Date
You can have the Scheduled Completion Date filled in automatically on new POAM items. Enter the number of days after the POAM item is created for each level:
- Patch Scans: Critical, High, Medium, and Low
- Checklist Vulnerabilities: CAT I, CAT II, and CAT III (the STIG high, medium, and low severities)
- Vulnerability Scans: Critical, High, Medium, and Low for technology vulnerability scans such as SAST, DAST, and container scans
For example, setting Patch Scans High to 30 means a new High patch vulnerability POAM item created on October 1 gets a Scheduled Completion Date of October 31. Leave a level blank (or 0) for no automatic date. Compliance statement, inherited control, and manually added POAM items never get an automatic date.
These settings only apply to new POAM items, including those created the first time you create the POAM for your system package. Existing POAM items are not changed when you change these settings, and a date or Office / Organization already on a POAM item is never overwritten. Re-uploading a checklist or scan keeps the dates on existing POAM items.
Uploading an eMASS formatted POAM still updates the Scheduled Completion Date from the file. A row with no date in the file clears the date on the matching POAM item.
Compliance Settings
The “Auto-add Not Reviewed policy CCI statements” setting is on by default. When it is on, every time you generate compliance any required policy CCI that has no compliance statement, and whose control is not inherited, gets a new compliance statement with a Not Reviewed status. This shows a true compliance for policy requirements instead of leaving them out of your compliance score. See Generate Compliance for the details.
Turn this setting off if you do not want these statements added. Turning it off does not remove statements already added; you can find them on the Compliance Statements page using the “Only auto-added statements” filter.
Authorization Expiration Warning
If you have the Authorization Expiration date set on your system package, you can set a warning on the system package dashboard for 30, 60, or 90 days to show the warning. That way you have information reminding you of your expiration.
Cyber Readiness Settings
There is a default setting at the Administration level per installation. These settings can be updated and saved at the site-wide level in the Administration menu. Or they can be done at the individual system package level. Any system package without defined cyber readiness settings uses the installation’s site-wide settings.
If you have the settings saved at the system package level and want to remove them and go back to the default site-wide settings, click the “Delete & Use Defaults” button to reset the settings.
Notes on the cyber readiness settings:
- the weights and rating score minimum and maximum are decimal values
- the maximum criticals can be blank, or be an integer
- the colors are set using the color picker and saved for web-display only
- the settings are shown in the XLSX export to ensure the ratings and weights are known while viewing the data
