Nessus Professional Integration
The Nessus Professional integration in OpenRMF® Professional allows you to import patch scans and audit compliance scans (based on DISA Benchmarks or CIS Benchmarks) into your system package.
Generate a Login Token
To use the Nessus Professional integration you must have an access key token and secret key token. To get this, click the Profile icon and select the Account button. Then choose the API Keys tab on that page to Generate the tokens. When generated, make sure you copy both tokens to use as you cannot look the up later.
See the image below for direction on how to get to the page to generate a token.

Enabling the Integration
To enable the integration, go to the Integrations and Plugins page and click the Nessus Professional option. The form shown below appears asking for the Root Nessus Professional URL, the access key (generated from your profile), as well as the secret key (generated from your profile) you can use to log in and import scan data.
You can test the Nessus Professional integration with the Test button before saving it. Please make sure the Test is successful before saving your integration information.
You can always return back and delete the integration as well. If you return to edit the integration you MUST include the password/token again as we do not transfer that back and forth to the Integration page. If this is a self-signed certificate HTTPS site you can click the “Allow HTTPS Connection” option so it accepts the HTTPS connection. You may need to do this if on a private network, a disconnected network, or using a self-signed certificate or a custom certificate authority.

Now that the integration is setup, return back to your system package dashboard and see there is an Import option under the Scans and Checklists button menu as well as the Nessus and Patch Data menu.
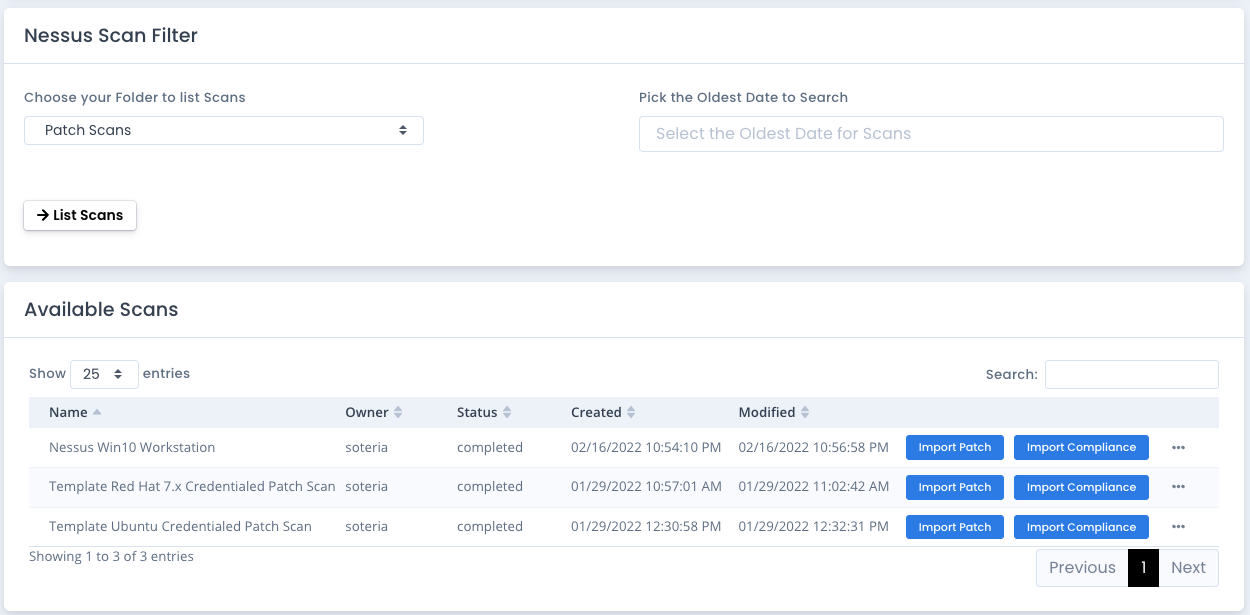
Listing OS Patch Scans
To import patch scan results, click the Host Scan Data button menu and choose the Import option. Choose your folder containing the OS patch scan(s) you wish to import, select a date (optional) for the oldest scan and click the List button. By default the application searches for scans within the last 31 days.
Listing Audit Compliance Scans
To import audit compliance scan results, click the Checklists button menu and choose the Import option. Choose your folder containing the audit compliance scan(s) you wish to import, select a date (optional) for the oldest scan and click the List button. By default the application searches for scans within the last 31 days.
Choosing your Scan to Import
From the Available Scans listing you can choose the Import Patch or Import Compliance scan. Based on the title and the details coming back from the Nessus API we cannot currently determine if this is a patch scan or a compliance scan. That said, it may be good to organize your patch scans and audit compliance scans in folders other than “My Scans” so they are not confused or misused. A compliance scan will not import as an OS patch scan and vice versa within OpenRMF® Professional. However, it may be good to organize them so you and your users can quickly import the data without problems or interruptions.
Choose the scan you wish to import and click the proper Import button. As long as it is a proper scan that is credentialed (or uncredentialed if allowed in System Package Preferences), it will import the data the same as if you uploaded a .nessus file. The same rules and automation apply around patch scans and audit compliance scans as well. Once completed your system package is updated for the proper checklist scores, patch scores, and other relevant data contained within the scan you imported.